
Friendship bracelets are a fun way for kids to express themselves and share their creativity with friends. They can come in different colors, shapes, and sizes and can be made with different materials, including string, beads, and even fabric. This friendship bracelet tutorial will show you how to create them using embroidery floss. They can be used to show a friendship or bond between two people, and they make a great gift that kids can give to somebody special. Friendship bracelets are also a great way to encourage kids to be creative and express themselves through art. Overall, this friendship bracelet tutorial is a great activity to do with kids, as it encourages creativity and friendship.
Supplies Needed for friendship bracelet tutorial:
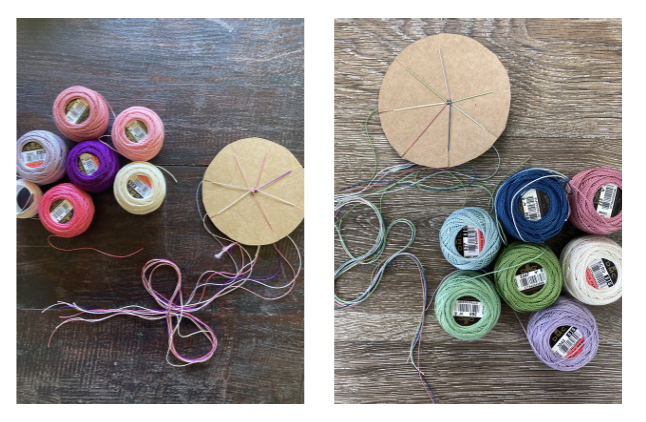
- Embroidery Floss or DMC pearle cotton N.8 (choose up to 7 colors)
- Cardboard (cereal box, soda can box)
- scissors
- pencil/pen
- cup to trace a circle
step-by-step instructions for this friendship bracelet tutorial:
- Decide what colors you want to use for this friendship bracelet tutorial, you can use up to 7 colors. Cut all your floss strands to about 26″ (I measure from my fingertips to my shoulder and that has been a good length) and line them up so they are an even length.
2. Tie a double knot in one end of the floss leaving a tail of floss about 4″ or so.
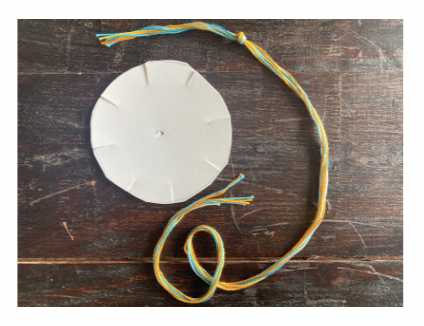
3. Trace your cup on the cardboard and then cut out your circle.
4. Mark a dot in the center of your circle to guide you when cutting the slits and making the hole in your loom.
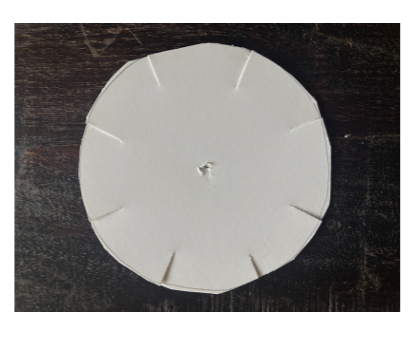
5. Cut 4 slits in the loom on each side trying to make the space between as even as possible. Cut an additional 4 slits between the one you have already cut, you will end up with 8 even slits around your circle.
6. Being very careful (get an adults help with this) use the tip of your scissors to create a small circle where you wrote the dot earlier. (this is for the knot) Try not to make it too big so that your knot will stay secure when making your bracelet.
7. Feed your knot through the hole you created on your loom, flip your loom over.
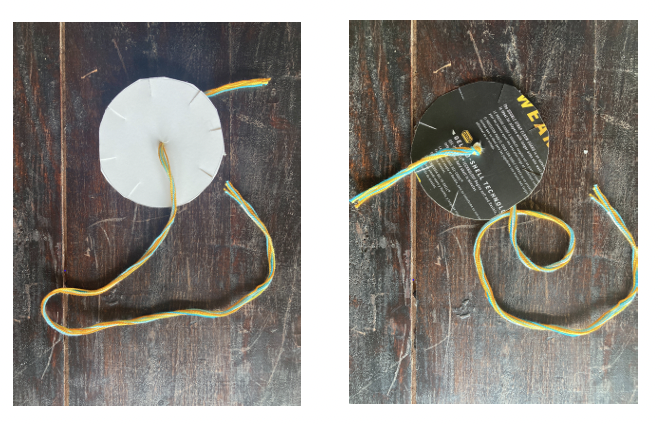
8. On the other side of your loom you will have all 7 strands of your embroidery floss, separate each strand and slide one strand in each of the slits you cut. You will have one empty slit.
9. Orient your loom to where the empty slit is facing you and count 1, 2, and on the 3rd strand of floss pull it out and place it into the empty slit in front of you.
10. Rotate the loom until you again have the empty slit in front of you.
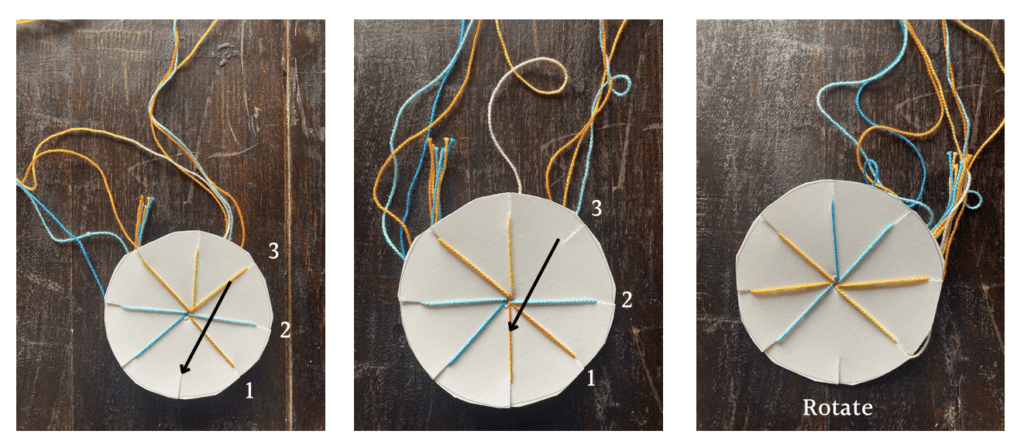
11. Repeat steps 9 and 10 until your bracelet is as long as you want it.
12. Once you are happy with the length take each strand of floss out of the slits and pull the bracelet out of the loom and tie a knot to secure the end.
13. Trim both ends of your bracelet leaving a tail for tying.
14. All done! Have fun creating these for all of your friends and family.

This friendship bracelet tutorial is such a fun project for kids! There are so many creative and meaningful ways to use them. You could have the kids make bracelets for each other to symbolize their friendship, or have them make a set of bracelets and give them away to friends and family. They could also make a bracelet for themselves as a reminder of how important and special their friendships are. You could also have the kids make and donate bracelets to a local charity or organization. There are so many possibilities!
If you use this friendship bracelet tutorial I would love to see them! You can tag me on Instagram @elevation_handmade.
Happy Crafting,