

As the leaves change and the air turns crisp, it’s time to add some cozy fall decor to your home. These fabric pumpkins are a delightful addition to your autumn-themed decorations, and they’re a fun and easy craft to create. In this guide, we’ll take you through the steps to make your own charming fabric pumpkins. Let’s get started on this crafty fall adventure!
Supplies and Tools for fabric pumpkins:
To make one pumpkin:
- (1) 7″ x 14″ Fabric (pumpkin)
- (1) 1″ x 7″ Fabric (leaves)
- Poly-fil
- Stick/Cinnamon stick
- Embroidery floss
- Needle
- Sewing Machine and thread (you can also hand sew)
- Fabric Scissors
- Ruler
- Marking tool (pencil)
step-by-step instructions to make a fabric pumpkin:
- Cut your fabric, using a ruler and a pencil.
- Fold your pumpkin fabric’s right sides together, and sew using a 1/4″ seam allowance. You can also hand sew this using a running stitch.

3. Thread your needle and tie a knot at the end. Take your needle through one layer of the fabric at one of the openings. Using the running stitch, stitch along the entire edge.

4. When you get to the end, cinch down the thread tie a couple of knots to secure the end, and trim your thread. Turn your fabric right side out.

5. Stuff your pumpkin with poly-fil.

6. Thread another piece of thread and tie a knot. You will repeat step 3 on the open end and tie a couple of knots to secure. Trim your thread.


7. Cut a piece of thread that is from your fingertips to your shoulder, and double that up. Fold the thread in half to find the middle and place the pumpkin in the middle. Tie the thread around the pumpkin and make a knot to secure.
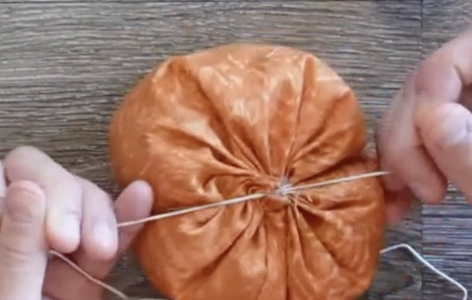
8. Rotate and create another circle around your pumpkin taking the ends under the knot you already created. Tie a knot to secure, and repeat one more time. Trim the thread.

9. Adjust the strands until you get the pumpkin sections just how you like them.

10. Add your stick to the middle where we cinched down the fabric earlier. If you cant find an opening, you can use hot glue to secure it.

11. Take your 1″ x 7″ piece of fabric and tie it around the stem for the leaves.


Congratulations! Your fabric pumpkin is ready to add a touch of autumn charm to your home decor. Place it on your mantel, table, or anywhere you want to infuse some fall spirit.
Conclusion:
Creating fabric pumpkins is a delightful and creative way to celebrate the beauty of autumn. These charming decorations will add warmth and personality to your home during the fall season. So, gather your supplies, start sewing, and enjoy the cozy atmosphere of your handmade fabric pumpkins. Happy crafting!